Difference between revisions of "ARMSway UW"
Jump to navigation
Jump to search
| (42 intermediate revisions by the same user not shown) | |||
| Line 1: | Line 1: | ||
| − | Tactics developed | + | Tactics developed for the easiest possible underworld speed clear, leaning into abundant characters in 2025 (Rangers & Dervishes). |
| − | |||
| − | |||
| − | {| class="wikitable" style="width:100%; | + | {| class="wikitable" style="width:100%; text-align:center;" |
| − | + | ! Role !! colspan="5" | Timeline | |
| − | ! | ||
|- | |- | ||
| − | | ''' | + | | '''MT, T1 (EoE), DEMO, Spiker, VoS''' || style="background-color:#D3D3D3;" colspan="1" | Chamber || || || |
|- | |- | ||
| − | | ''' | + | | '''MT, T1 (EoE), DEMO, Spiker, VoS''' || || style="background-color:#D3D3D3;" colspan="2" | Escort of Souls || || |
|- | |- | ||
| − | | ''' | + | | '''Main Tank & DEMO''' || || || style="background-color:#D3D3D3;" colspan="2" | Unwanted Guests || |
|- | |- | ||
| − | | ''' | + | | '''Spiker & VoS''' || || || style="background-color:#D3D3D3;" colspan="2" | Wrathful Spirits || |
|- | |- | ||
| − | | ''' | + | | '''T1''' || || || || style="background-color:#D3D3D3;" colspan="1" | Servants of Grenth || |
|- | |- | ||
| − | | ''' | + | | '''T3 & T4''' || || style="background-color:#D3D3D3;" colspan="2" | Imprisoned Spirits || || |
|- | |- | ||
| − | | ''' | + | | '''T3 & T4''' || || || || style="background-color:#D3D3D3;" colspan="1" | The Four Horsemen || |
|- | |- | ||
| − | | ''' | + | | '''T2''' || || style="background-color:#D3D3D3;" colspan="2" | Demon Assassin || || |
| + | |- | ||
| + | | '''T2''' || || || || style="background-color:#D3D3D3;" colspan="1" | Terrorweb Queen || | ||
| + | |- | ||
| + | | '''Everyone''' || || || || || style="background-color:#D3D3D3;" colspan="1" | Dhuum | ||
|} | |} | ||
| − | |||
| − | |||
| − | |||
| − | |||
| − | |||
| − | |||
| − | |||
| − | |||
| − | |||
| − | |||
| − | |||
| − | |||
| − | |||
| − | |||
| − | |||
| − | |||
| − | |||
| − | |||
| − | |||
| − | |||
| − | |||
| − | |||
| − | |||
| − | |||
| − | |||
| − | |||
| − | |||
| − | |||
| − | |||
| − | |||
| − | |||
| − | |||
| − | |||
| − | |||
| − | |||
| − | |||
| − | |||
| − | |||
| − | |||
| − | |||
| − | |||
| − | |||
| − | |||
| − | |||
| − | |||
| − | |||
| − | |||
| − | |||
| − | |||
| − | |||
| − | |||
| − | |||
| − | |||
| − | |||
| − | |||
| − | |||
| − | |||
| − | |||
| − | |||
| − | |||
| − | |||
| − | |||
| − | |||
| − | |||
| − | |||
| − | |||
| − | |||
| − | |||
| − | |||
| − | |||
| − | |||
| − | |||
| − | : | + | '''Dhuum Battle:''' |
| − | :: | + | : ⚜️ Dhuum Battle: [https://www.youtube.com/watch?v=BvrNdjrMkvo How to make Dhuum Sit EVERY time (Dhuum Suicide Glitch)] |
| − | |||
| − | |||
| − | + | ='''Main Tank (Chamber, Solo Escourt, UwG)'''= | |
| + | {{ FullSkillbar|{{R}}/{{A}}|Shadow Form|Shroud of Distress|Mental Block|Dwarven Stability|Whirling Defense|Recall|Shadow of Haste|Viper's Defense|Shadow:12, Expertise:12+1+3, Marks:3|}} | ||
| − | + | :: ◉ Ball chamber with WD and MB | |
| − | + | :: ◉ Ball lab with WD and MB | |
| + | :: ◉ Solo Escourt with SoH, MB, Recall | ||
| + | :: ◉ Complete UwG | ||
| + | :: ◉ Take Dhuum Quest, cancel Recall, glitch Dhuum | ||
| + | :: ◉ Drink a battle isle ice tea to kill yourself and spam 1 at Dhuum | ||
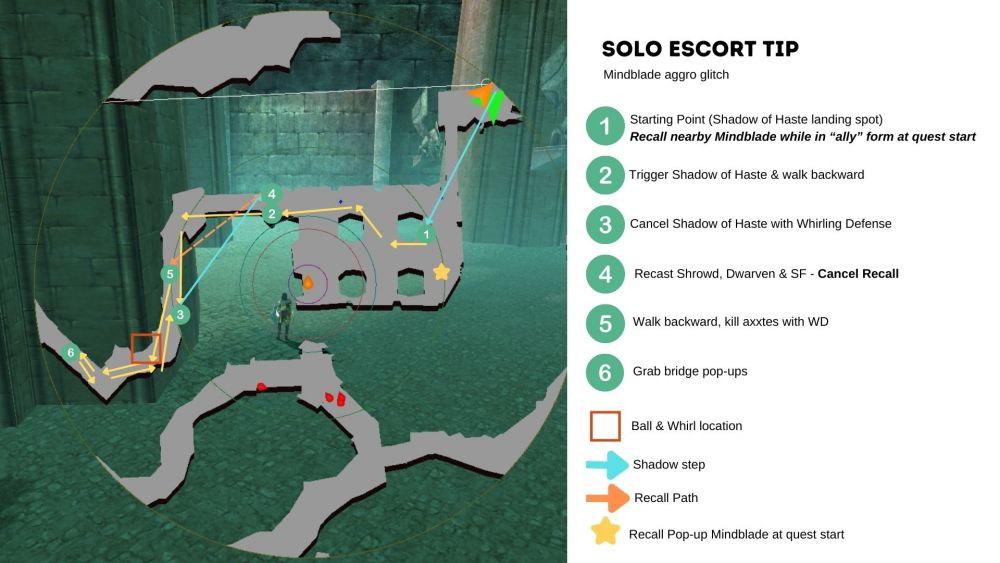
| − | :: | + | [[File:Solo Escourt Guide.jpg|1000px|thumb||Solo Escort Guide]] |
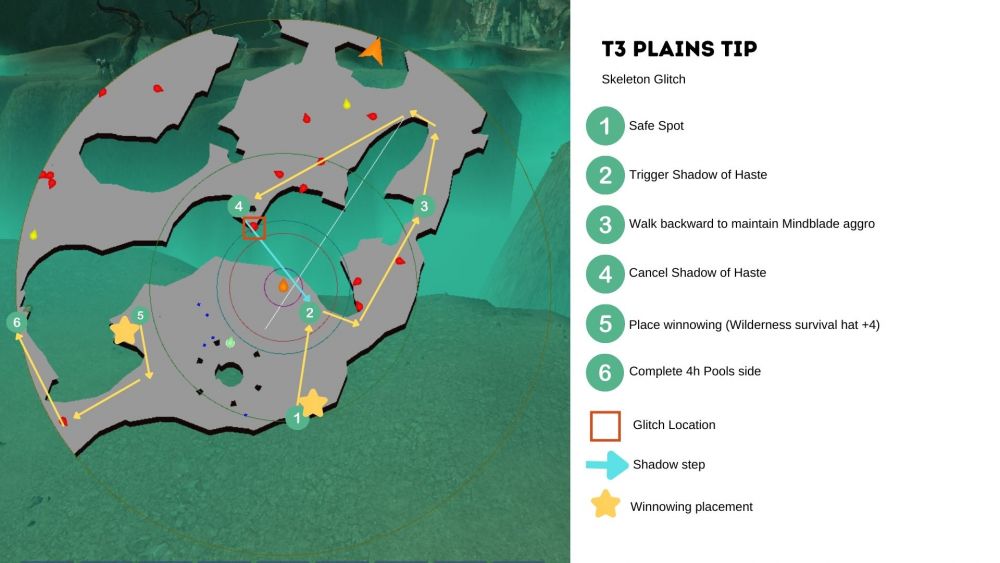
| + | [[File:T3 Plains Glitch Guide.jpg|1000px|thumb||T3 Plains Glitch]] | ||
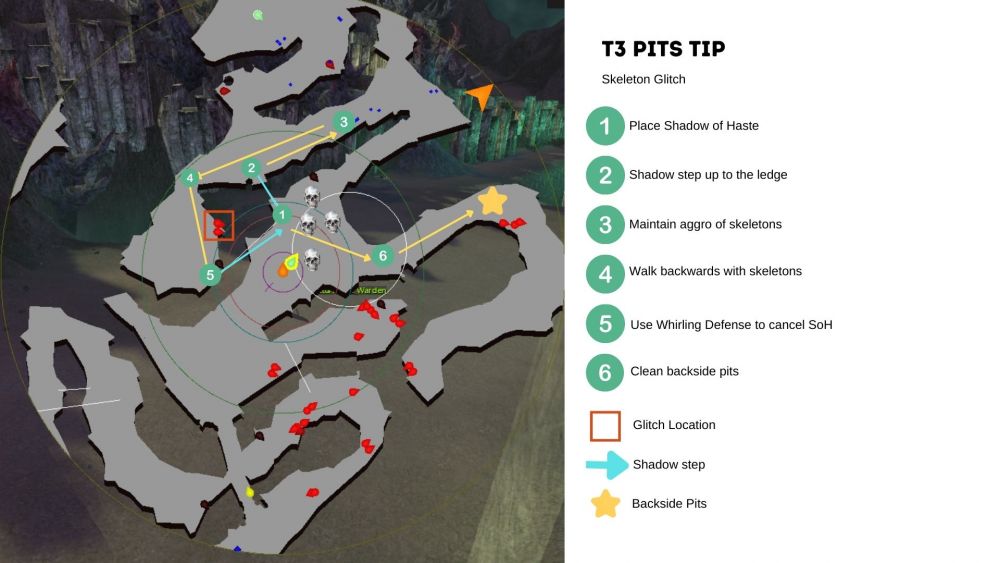
| + | [[File:T3 Pits Glitch.jpg|1000px|thumb||Pits Skele Glitch]] | ||
| − | :: | + | ='''Spiker (Chamber, Lab & Vale)'''= |
| + | {{FullSkillbar|{{N}}/{{D}}|Eternal Aura|Dark Aura|Masochism|Grenth's Aura|Soul Taker|Ebon Escape|Lyssa's Haste|Eremite's Attack|Death: 12+1+3, Wind: 9, Soul: 9+3, Scythe: 3|}} | ||
| − | :: ◉ | + | :: ◉ [https://www.youtube.com/watch?v=-2ZmGp_r4uo Chamber & Lab Spike] |
| + | :: ◉ Spike ball in chamber, & lab | ||
| + | :: ◉ Spike balls in vale from Derv | ||
| + | :: ◉ Drink a battle isle ice tea to kill yourself and spam 1 at Dhuum | ||
| − | |||
| + | ='''Vale (Clean-up & Vale)'''= | ||
| + | {{ FullSkillbar|{{D}}/{{N}}|Vow of Strength|Sand Shards|Veil of Thorns|Eremite's Attack|Ebon Battle Standard of Honor|Mirage Cloak|Mystic Regeneration|Animate Shambling Horror|}} | ||
| − | + | :: ◉ Clean up any nightmares | |
| + | :: ◉ Clean vale and duo quest with Necro | ||
| + | :: ◉ Bring a minion skill to glitch team into dhuum's chamber | ||
| + | :: ◉ Drink a battle isle ice tea to kill yourself and spam 1 at Dhuum | ||
| − | :: | + | ='''DEMO''' |
| + | {{FullSkillbar|{{D}}/{{R}}|Vow of Revolution|Mystic Healing|Antidote Signet|Serpent's Quickness|Dwarven Stability|Brambles|Great Dwarf Weapon|Quickening Zephyr|Wind: 12+1+3, Mystic: 9, Wild: 9|}} | ||
| − | :: ◉ | + | :: ◉ Alternate spam between antidote signet and mystic healing to maintain energy |
| + | :: ◉ Support MT in UwG with GDW and brambles (Bleeding degen) | ||
| + | :: ◉ Maintain QZ at Dhuum | ||
| − | |||
| − | |||
| − | |||
| − | :: | + | ='''Terra 1 (Wastes)'''= |
| + | {{ FullSkillbar|{{R}}/{{A}}|Shadow Form|Shroud of Distress|Shadow of Haste|Viper's Defense|Death's Charge|Dwarven Stability|Whirling Defense|Edge of Extinction|Shadow:12, Expertise:12+1+3, Beast:3|}} | ||
| − | :: ◉ | + | :: ◉ Follow mainteam with EoE until Escourt spike |
| + | :: ◉ Use SoH to solo wastes quest | ||
| + | :: ◉ Drink a battle isle ice tea to kill yourself and spam 1 at Dhuum | ||
| − | |||
| − | |||
| − | {{FullSkillbar|{{ | + | ='''Terra 2 (Mnts+ Pools)'''= |
| + | {{ FullSkillbar|{{R}}/{{A}}|Shadow Form|Shroud of Distress|Shadow of Haste|Viper's Defense|Death's Charge|Dwarven Stability|Whirling Defense|Finish Him|Shadow:12, Expertise:12+1+3, Marks:3|}} | ||
| − | + | :: ◉ Stay within adjacent zone of wurms to prevent healing springs | |
| + | :: ◉ Equip staff when in mnts | ||
| + | :: ◉ Utilize SoH to speed up pools | ||
| + | :: ◉ Drink a battle isle ice tea to kill yourself and spam 1 at Dhuum | ||
| − | |||
| − | + | ='''Terra 3 (Pits + Plains)'''= | |
| − | :: | + | {{ FullSkillbar|{{R}}/{{A}}|Shadow Form|Shroud of Distress|Mental Block|Viper's Defense|Death's Charge|Dwarven Stability|Whirling Defense|Shadow of Haste|Shadow:12, Expertise:12+1+3, Marks:3|}} |
| − | |||
| − | |||
| − | |||
| − | + | :: ◉ Glitch skeles in pits | |
| + | :: ◉ Take front pits | ||
| + | :: ◉ Glitch mindblades in plains (leave patrol) | ||
| + | :: ◉ Take Pools or Pits side 4h | ||
| + | :: ◉ Drink a battle isle ice tea to kill yourself and spam 1 at Dhuum | ||
| − | =''' | + | ='''Terra 4 (Pits + Plains)'''= |
| + | {{ FullSkillbar|{{R}}/{{A}}|Shadow Form|Shroud of Distress|Ebon Battle Standard of Honor|Viper's Defense|Death's Charge|Dwarven Stability|Whirling Defense|Winnowing|Shadow:12, Expertise:12+1+3, Marks:3|}} | ||
| − | :: ◉ | + | :: ◉ Place winnowing in safe spot for shrine pop |
| + | :: ◉ Place winnowing in safe spot for backside | ||
| + | :: ◉ Take backside pits | ||
| + | :: ◉ Place winnowing in plains safe spot for shrine | ||
| + | :: ◉ Place winnowing in plains safe spot for 4h | ||
| + | :: ◉ Take Pools or Pits side 4h | ||
| + | :: ◉ Drink a battle isle ice tea to kill yourself and spam 1 at Dhuum | ||
| − | |||
| + | ='''Dhuum'''= | ||
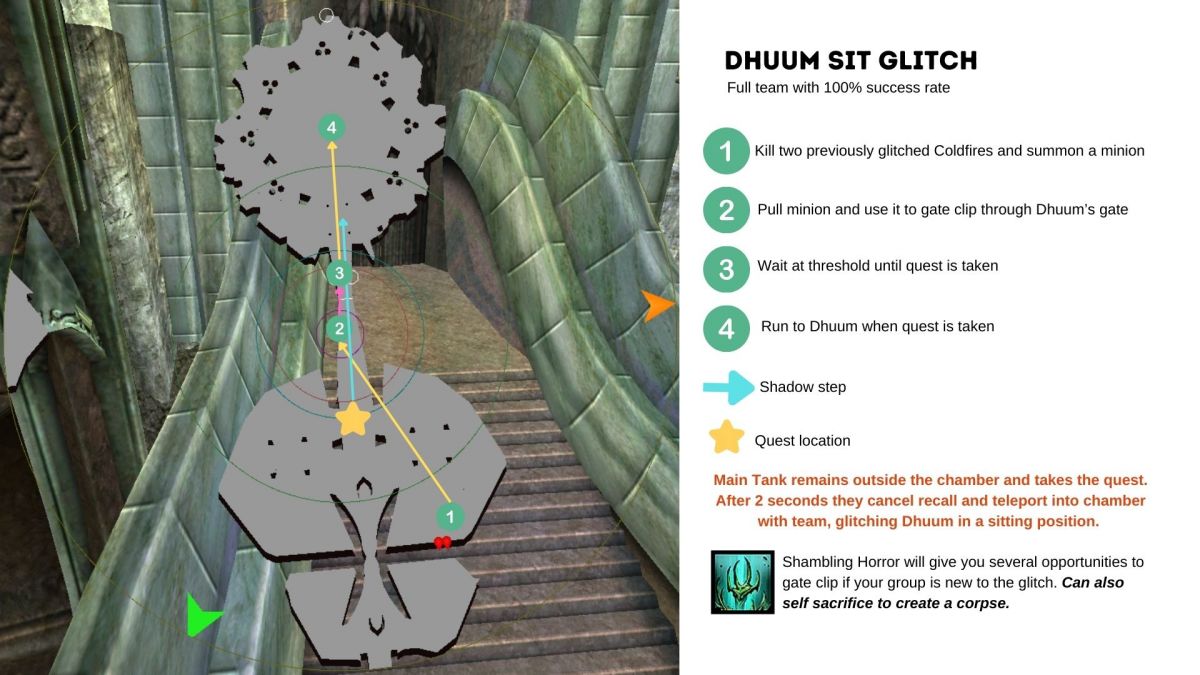
| − | + | Dhuum sit glitch | |
| − | |||
| − | + | [https://www.youtube.com/watch?v=BvrNdjrMkvo How to glitch Dhuum] | |
| − | |||
| − | [[File: | + | [[File:Dhuum Sit Glitch Guide.jpg|1200px|thumb|left|Dhuum Sit Glitch]] |
Revision as of 21:45, 21 February 2025
Tactics developed for the easiest possible underworld speed clear, leaning into abundant characters in 2025 (Rangers & Dervishes).
| Role | Timeline | ||||
|---|---|---|---|---|---|
| MT, T1 (EoE), DEMO, Spiker, VoS | Chamber | ||||
| MT, T1 (EoE), DEMO, Spiker, VoS | Escort of Souls | ||||
| Main Tank & DEMO | Unwanted Guests | ||||
| Spiker & VoS | Wrathful Spirits | ||||
| T1 | Servants of Grenth | ||||
| T3 & T4 | Imprisoned Spirits | ||||
| T3 & T4 | The Four Horsemen | ||||
| T2 | Demon Assassin | ||||
| T2 | Terrorweb Queen | ||||
| Everyone | Dhuum | ||||
Dhuum Battle:
- ⚜️ Dhuum Battle: How to make Dhuum Sit EVERY time (Dhuum Suicide Glitch)
Contents
Main Tank (Chamber, Solo Escourt, UwG)

|

|

|

|

|

|

|

|
Shadow:12, Expertise:12+1+3, Marks:3
| |||||||
- ◉ Ball chamber with WD and MB
- ◉ Ball lab with WD and MB
- ◉ Solo Escourt with SoH, MB, Recall
- ◉ Complete UwG
- ◉ Take Dhuum Quest, cancel Recall, glitch Dhuum
- ◉ Drink a battle isle ice tea to kill yourself and spam 1 at Dhuum
Spiker (Chamber, Lab & Vale)

|

|

|

|

|

|

|

|
Death: 12+1+3, Wind: 9, Soul: 9+3, Scythe: 3
| |||||||
- ◉ Chamber & Lab Spike
- ◉ Spike ball in chamber, & lab
- ◉ Spike balls in vale from Derv
- ◉ Drink a battle isle ice tea to kill yourself and spam 1 at Dhuum
Vale (Clean-up & Vale)

|

|

|

|

|

|

|

|
<Template Code>
| |||||||
- ◉ Clean up any nightmares
- ◉ Clean vale and duo quest with Necro
- ◉ Bring a minion skill to glitch team into dhuum's chamber
- ◉ Drink a battle isle ice tea to kill yourself and spam 1 at Dhuum
=DEMO

|

|

|

|

|

|

|

|
Wind: 12+1+3, Mystic: 9, Wild: 9
| |||||||
- ◉ Alternate spam between antidote signet and mystic healing to maintain energy
- ◉ Support MT in UwG with GDW and brambles (Bleeding degen)
- ◉ Maintain QZ at Dhuum
Terra 1 (Wastes)

|

|

|

|

|

|

|

|
Shadow:12, Expertise:12+1+3, Beast:3
| |||||||
- ◉ Follow mainteam with EoE until Escourt spike
- ◉ Use SoH to solo wastes quest
- ◉ Drink a battle isle ice tea to kill yourself and spam 1 at Dhuum
Terra 2 (Mnts+ Pools)

|

|

|

|

|

|

|

|
Shadow:12, Expertise:12+1+3, Marks:3
| |||||||
- ◉ Stay within adjacent zone of wurms to prevent healing springs
- ◉ Equip staff when in mnts
- ◉ Utilize SoH to speed up pools
- ◉ Drink a battle isle ice tea to kill yourself and spam 1 at Dhuum
Terra 3 (Pits + Plains)

|

|

|

|

|

|

|

|
Shadow:12, Expertise:12+1+3, Marks:3
| |||||||
- ◉ Glitch skeles in pits
- ◉ Take front pits
- ◉ Glitch mindblades in plains (leave patrol)
- ◉ Take Pools or Pits side 4h
- ◉ Drink a battle isle ice tea to kill yourself and spam 1 at Dhuum
Terra 4 (Pits + Plains)

|

|

|

|

|

|

|

|
Shadow:12, Expertise:12+1+3, Marks:3
| |||||||
- ◉ Place winnowing in safe spot for shrine pop
- ◉ Place winnowing in safe spot for backside
- ◉ Take backside pits
- ◉ Place winnowing in plains safe spot for shrine
- ◉ Place winnowing in plains safe spot for 4h
- ◉ Take Pools or Pits side 4h
- ◉ Drink a battle isle ice tea to kill yourself and spam 1 at Dhuum
Dhuum
Dhuum sit glitch


