User:Ether
Contents
Links
https://www.youtube.com/user/ShiBaindo/
Personal Records
Domain of Anguish Records
1 man: 52 Minutes [TAS]
1 man: 58 Minutes [STANDARD]
1 man: 59 Minutes [PURE]
2 man: 34 Minutes [TAS]
2 man: 37 Minutes [STANDARD]
3 man: 29 Minutes [TAS]
4 man: 29 Minutes [TAS]
4 man: 30 Minutes [STANDARD]
8 man: 15 Minutes [TAS] (w/ gate glitch)
8 man: 16 Minutes [TAS] (w/ gate glitch)
8 man: 17 Minutes [TAS] (w/o gate glitch)
8 man: 19 Minutes [STANDARD]
Different behavior from mobs when spawning with certain weapons: https://youtu.be/BQx33XuMJg0
Custom Toolbox
The tb you see me use in the videos is able to be downloaded here
Solo

|

|

|

|

|

|

|

|
Shadow:12, Expertise:12+1+3, Marksmanship:3
OgcTc588ZSn5A6ijAaR8uU4ozBA
| |||||||
|
|
|

|

|

|
|
|
|
Shadow:12, Expertise:12+1+3, Marksmanship:3
OgcTc588ZSn5AimEBKu8uU4ozBA
| |||||||
Armor Sets
Standard Armor Set

- 5x Blessed Runes
- 1x +1+3 Expertise Headpiece
- 1x Superior Vigor
- 3x Vitae Runes
Earth Armor Set
- 5x Earthbound Runes
- 1x +1+3 Expertise Headpiece
- 1x Superior Vigor
- 3x Vitae Runes
High HP Armor Set

- 5x Survivor Runes
- 4 Vitae Runes
- 1x Superior Vigor
Weapons


A q7 flatbow can be crafted at Blacktide Den
Useful Movement Macros
- (7535, -11960) ranger lord glitch spot (on the side of necro trench)
- (13098, -9817) monk lord trench glitch spot ( on left 360 hill)
- (9906, -13057) mes trench glitch spot (on right 360 hill)
- (8800, -8665) juicy 360 thing
- (6474, -17196) right side clover glitch spot
  (-19019, 13188) 4th room 1st move macro, this is right outside the trigger point for the 4th room
  (-19491, 12803) 4th room 2nd move macro, this is on the right wall if you were to face 5th room.
  Using these two move macros right after the other will allow you to get a significant amount of souls into 4th room
Duplicating Tormentors
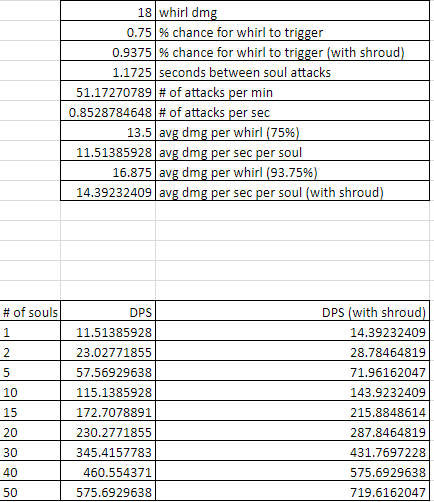
For the near entirety of the run you will be duplicating Tormentors. Basically, you damage any tormentor so its below 50% health, and at some point it will cast Call to the Torment. It spawns a copy of the tormentor in its exact location. By duplicating many tormentors over the run, you are able to use this as whirling fuel to kill shit really fast.
Some general rules each tormentor follows when deciding whether or not to duplicate are:
1. They have to be in aggro/combat with something (yourself/stone/npc/etc). Note that aggro conditions include: having chain/corpse/part of a group aggro on anything that might not necessarily be in your own aggro range
2. They have to be under 50% hp
3. The tormentor does not have "CoT aggro" with any duping mobs. (CoT range is 750-850~ units away)(CoT range or "CoT aggro" acts similarly to aggro mechanics - except its with other tormentors. this means there is chain/corpse/part of a group aggro for CoT.)
4. If there is a tormentor within CoT range, the game checks if there are any tormentors casting within that second tormentors range, if yes: then the original one does not dupe. if no, then the original one dupes.
5. When a tormentor starts to decide whether or not to dupe, is currently unknown. Possible triggers are updating the tormentors position/updating the tormentors direction.
Noting all of that, certain tormentors only duplicate in certain conditions.
Waters: they have to not be settled on anything
General Usage
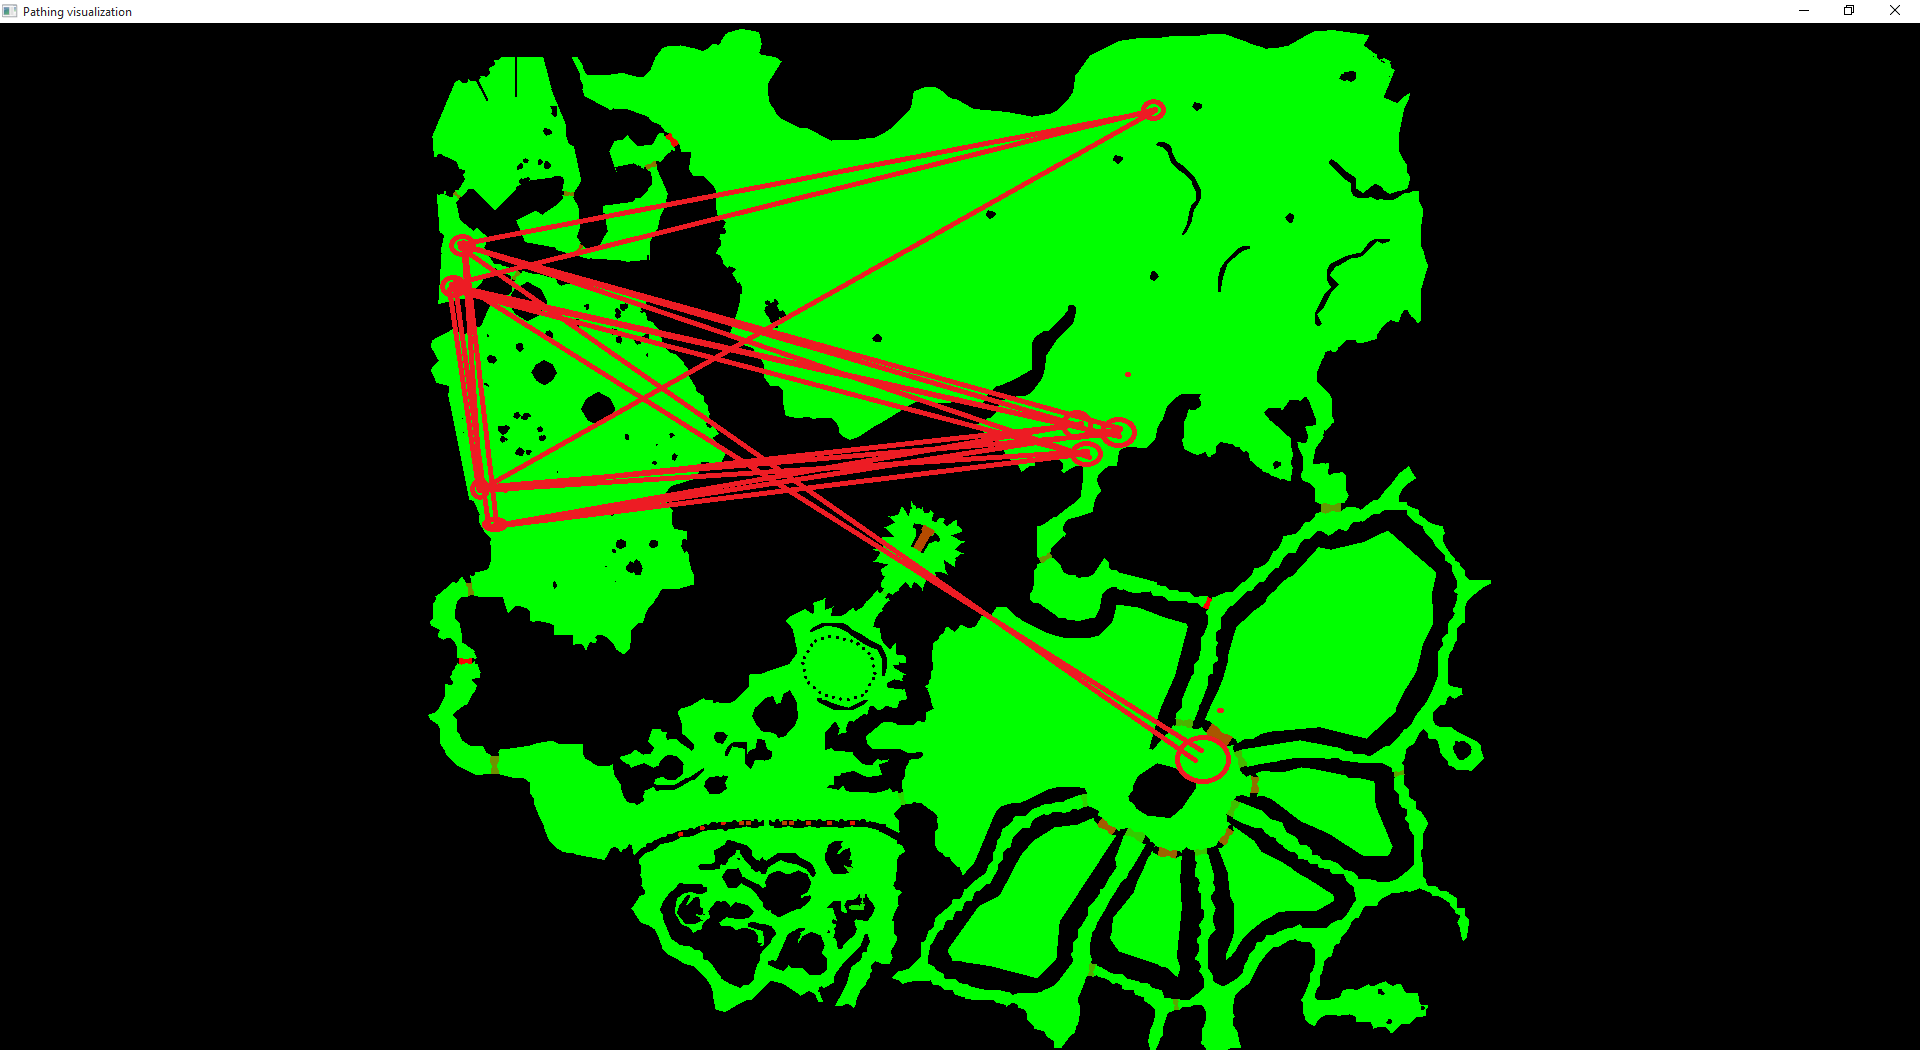
The red circles on the picture are where souls spawwn, or where they break. The red lines are to show where the soul will go after it breaks aggro. Depending on where the soul was spawned, determines which direction it will run towards when broken.
Gloom

There are 4 parts to Gloom. They are:
1. Cave
Cave consists of 3 "waves", each spawning 4 different groups of enemies. Knowing which groups spawn in each wave is crucial to completing a solo run.
2. Rift
3. Deathbringer
4. Darkness
Foundry

The Foundry rooms are just run and spike. You need to move in continuous, smooth lines to not break souls when going thru gates. Going thru room 2 and the room 4 gate is where your movement matters the most, as souls break here. Watch the video to see how to run into the rooms.
Take the quest [Q1]
Room 1
Wait for Margonites to ball, run in Whirl. Spike Titans on spawn
Room 2
Try to speed boost ball the Margonites together and whirl them with the Torturewebs. For the 2nd wave kill the Torturewebs if they are balled, otherwise right wall block the dreamies and whirl those first.
Room 3
Grab all the Titans and the Torturewebs [R3a] and right wall block to whirl the titans and the glitched Dreamrider [R3b]. Then kill the Torturewebs [R3c]
Room 4
Run to the furthest point of the room and dupe souls while doing the room [R4]. Try to right wall block dementias. On the 3rd wave try to kill the Despairs first as they take longer to settle. Last wave just ball and spike. While killing the waves, its very important to keep all glitched souls on the wall under 50% health, and to be in aggro of the glitched souls so they dupe.
Room 5
TBA
City
Whirl and move down the wall. You can get pretty intricate with how you do City, but its basically just whirling mobs 1 by 1.
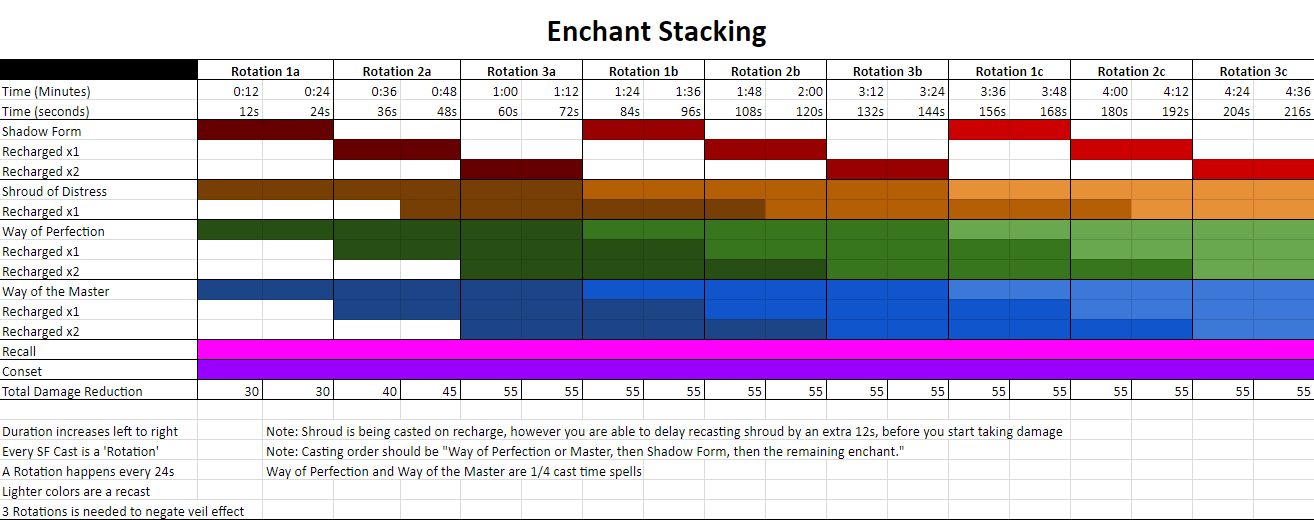
Veil
In veil there are 4 different enemies that can rupt your skills (Shadow Form, Way of The Master, Way of Perfection, Shroud of Distress, Dwarven). They are:
1. Stygian Fiends
They can rupt with Choking gas (every auto attack they hit rupts you), Concussion Shot ( dazes you too), Distracting Shot, or Savage Shot.
2. Spirit Tormentors
Spirits can rupt with only Savage Shot.
3. Sanity Tormentors
Sanities can rupt with Disrupting throw (only rupts when you have a condition) or Stunning Strike (requires adrenaline and dazes).
4. Ranger Lord
The Stygian Underlord can rupt with Distracting Shot, and Savage Shot.
2 Man
2 Rangers
2 Rangers: Fastest possible team, but extremely hard to do without extensive knowledge and experience.
|
|
|
|
|
|
|
|
|
|
|
|
|
|
|
|
|
|
The main concept is that you use a large amount of souls to whirl foundry rooms and city, and to split in veil.
Ranger Mes
Ranger Mes Duo: City and Veil can be difficult without extensive knowledge and experience
|
|
|
|
|

|
|
|
|

|

|

|

|

|

|

|

|
The main concept is whirling foundry with souls, and then just balling and spiking city/veil.
Ranger Monk
1 Ranger 1 Monk: Safest team, but the slowest. The ranger needs experience and knowledge to do his job, but the monk is much more relaxed.
|
|
|
|
|
|
|
|
|

|

|

|

|
|

|
|
|
The ranger does close to what a regular solo would do, except you have a monk bonder. Bonder allows the ranger to cast less enchants, and to have more energy. The monk can also be used to place spirits, take snakes, quests etc.
3 Man
literally just the solo bar x3
|
|
|
|
|
|
|
|
|
|
|
|
|
|
|
|
|
|
|
|
|
|
|
|
|
|
|
4 Man
|
|
|
|
|
|
|
|
|

|

|

|

|
|
|

|
|

|
|

|

|

|

|
|
|

|

|

|

|
|

|

|
|
5 Man
|
|
|
|
|
|
|
|
|
|
|
|
|
|
|
|
|
|
|
|
|
|
|
|
|

|
|
|
|

|
|

|
|
|

|
|
|
|
|
|
|
|
|
|
|
6 Man
|
|
|
|
|

|
|

|
|
|
|
|
|
|
|
|
|
|

|
|
|
|
|
|
|
|
|
|
|
|

|
|
|
|
|
|
|
|
|
|
|

|
|
|
|
|
|
|
|
|
|
|
|
fmaw stuff aids
Level 1
- /age 1
Level 2
- /age 2
Level 3
- /age 3 for 10
- /age 2 for 9
Level 4
- /age 1
Level 5
- /age 3