User:Ether
Different behavior from mobs when spawning with certain weapons: https://youtu.be/BQx33XuMJg0
Contents
im gonna put some tactics/general info for smaller party sizes here until i figure out where to put them
Solo

|

|

|

|

|

|

|

|
|
|
|

|
|
|
|
|

|
Armor
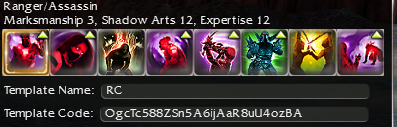
With the RC Bar, you want
- 5x Blessed
- 1x +4 Expertise Headpiece
- 1x Superior Vigor
- 3x Vitae Runes
- 1x Blessed +1 Expertise Headpiece of Vitae
With the SoH Bar, you want
- 5x Blessed
- 1x +4 Expertise Headpiece
- 1x Superior Vigor
- 3x Attunement Runes
- 1x Blessed +1 Expertise Headpiece of Vitae
Weapons
For both bars you want
- 20% Ench Weapon with +5e
- 20% Ench Weapon with 10% HCT
- +10 vs Demons, +xxhp (+45hp ^ ench is ideal)
- +10 vs Earth, +45 hp ^ ench
- +20e Staff
- Vampiric Flatbow of Enchanting
For the SoH bar you also want
- 20% Ench Zealous Spear with +5e
General Usage
The RC Bar makes Gloom/Foundry a bit more annoying to do, as you dont have an SoH to easily take quests, take+glitch snakes. The bar also makes city easier, and veil significantly easier and faster. Having recall makes it so you have 1 less enchant to cast every cycle in veil, but it makes energy more annoying with only 2 pips of regen. With LB sig the less energy regen is negated. LB Sig is used for the instant 24 energy in Veil, allowing you to be much more mobile and faster than the SoH bar.
Gloom
Gloom is fairly straight-forward with both bars. You do cave while duping souls, finish + run quests. You have the option of duping the souls at rift if wanted. If you want to be safe you kill all Sanities/Spirits that spawn from rift. Deathbringer you spike once NPC's are dead, and Darkness you right wall block on the Earths.
Foundry
The Foundry rooms are just run and spike. You need to move in continuous, smooth lines to not break souls when going thru gates. Going thru room 2 and the room 4 gate is where your movement matters the most, as souls break here. Watch the video to see how to run into the rooms.
Room 1
Wait for Margonites to ball, run in Whirl. Spike Titans on spawn
Room 2
Try to speed boost ball the Margonites together and whirl them with the Torturewebs. For the 2nd wave kill the Torturewebs if they are balled, otherwise right wall block the dreamies and whirl those first.
Room 3
Grab all the Titans and the Torturewebs and right wall block to whirl the titans and the glitched Dreamrider. Then kill the Torturewebs
Room 4
Run to the furthest point of the room and dupe souls while doing the room. Try to right wall block dementias. On the 3rd wave try to kill the Despairs first as they take longer to settle. Last wave just ball and spike.
Room 5
TBA
City
Whirl and move down the wall. You can get pretty intricate with how you do City, but its basically just whirling mobs 1 by 1.
Veil
TBA.
2 Man
2 Rangers
2 Rangers: Fastest possible team, but extremely hard to do without extensive knowledge and experience.
|
|
|
|
|
|
|
|
|
|
|
|
|
|
|
|
|
|
The main concept is that you use a large amount of souls to whirl foundry rooms and city, and to split in veil.
Ranger Mes
Ranger Mes Duo: City and Veil can be difficult without extensive knowledge and experience
|
|
|

|

|

|
|
|
|

|

|

|

|

|

|

|

|
The main concept is whirling foundry with souls, and then just balling and spiking city/veil.
Ranger Monk
1 Ranger 1 Monk: Safest team, but the slowest. The ranger needs experience and knowledge to do his job, but the monk is much more relaxed.
|
|
|
|
|
|
|
|
|

|

|

|

|
|

|
|
|
The ranger does close to what a regular solo would do, except you have a monk bonder. Bonder allows the ranger to cast less enchants, and to have more energy. The monk can also be used to place spirits, take snakes, quests etc.
3 Man
TBA
4 Man
TBA
5 Man
|
|
|
|
|
|
|
|
|

|
|

|

|

|

|
|
|

|

|
|

|

|
|

|
|
|
|
|
|
|
|

|

|
|

|

|

|

|
|
|

|
|
6 Man
|
|
|
|
|

|
|
|
|
|
|
|
|
|
|
|
|
|
|
|
|
|
|
|
|
|
|
|
|
|
|
|
|
|
|
|
|
|
|
|
|
|
|
|
|
|
|
|
|
|
|
|
|
|
Loa Tactics
|
|
|
|
|
|
|
|
|
|
|
|
|
|
|
|
|
|
|
|
|
|
|
|
|
|
|
|
|
|
|
|
|
|
|
|
|
|
|
|
|
|
|
|
|
|
|
|
|
|
|

|
|
|

|

|
|
|
|

|

|
|
|
|
|
|
|
|
|
|
|
MLK Optionals: for beginners for exp players
Ryn TK Bar:
|
|
|
|
|
|
|
|
|
George IAU Bar:
|
|
|
|
|
|
|
|
|
Ether MT Bar:
|
|
|
|
|
|

|

|
|
Cruz TT Bar:
|
|
|
|
|

|
|
|
|
The main characteristics are jumps (EE, Recall or HoS) on every player and Edge of Extinction on the Seeder, which allows the Caller to have full Fast Casting, or bring other skills as optionals.
Tactics specific to Loa Tactics
- TK Takes 1st Snake, Caller takes 2nd.
- Edge of Extinction is placed outside city so the MT can hos thru right side. It is also in range of the 2nd spike.
- At the start of Gloom everyone should jump up the hill, so that MT can pull the spirits towards the gate as a DC target for the Trench Tank.
Pros
- The teambuild is capable of a very fast run (21).
- Shadow step on everyone
- Edge of Extinction on Seeder allows Caller to spike without delay.
Cons
- No Arcane Echo on Seeder requires good Seed of Life timing.
Overview
| Templates | OwFkUld5HPOkOzBENJCEuTDUoTnD | OwFkUld5HPOkOzBENJCEuTDkNZnD | OQlCIMwEcpbjpjgzGw0jNJdJ | OQdDErsASLBnAmOIgylTPxkdO | OQdTAYB/HaJ4Ew0BBSuc6xmkmE | OQhCIMw0SwJgpjGAHw0zNFdJ | OwIT8MIbXC6IHUu8uiuEgIeghA | OgNAQ1C3MaRkE0lHExDyD |
| Equipment | Optional: Infiltrator's set for Gloom Cave | low HP armor for Jadoth | triple sup runes (illusion for Wandering Eye); bow for ele lord | bow for derv lord | ||||
| Foundry | ||||||||
| entry | take quest | take quest | take quest | take quest | ||||
| 1st room | place EoE, PI a rage | |||||||
| 2nd room | any mesmer can pop a ghastly | PI tortureweb dryders | bond MT with prot and life | |||||
| 3rd room | if you have a ghastly up try to kill it on the 2nd titan spawn | focus dream rider | EoE in range of where the titans will be balled; PI a dryder if it's out of the ball | |||||
| 4th room | tank/ball all waves | focus dream rider | use EoE in corner for 2nd wave | |||||
| 5th room | rush left, take quest | rush to aggro centre | take quest | rush right - do NOT take quest | ||||
| Snakes | take Captain (3rd) | pull groups out of the way | take General (2nd) | take Silzesh (1st) | rush ahead, get EEd | ping for Captain | ping for snakes and seed | keep snakes alive |
| Black Beast | Pull Black Beast | EoE in range of Black Beast and Fury; seed | heal IaU | |||||
| City | ||||||||
| Outside | 1st Ball | 2nd Ball | VoR and Unnatural on manks | Unnatural and ESurge on manks | Backfire and Unnatural on sus | PI on each su. Put EoE on right of the gate to inside, so MT can HoS. | ||
| Inside | Left ball | Right ball | spike right side, and then left | let the MT recall you; place EoE in range of both balls; EE down to the emo; accept quest reward | stand at the bottom, in range of both tanks | |||
| Veil | ||||||||
| Jadoth | use cupcake , run to 360, pull first wave to glitch spot for MLK | use low health set and ball Jadoth | skip Jadoth, take 360 quest, go to glitch spot, and kill first wave with Wastrel's | |||||
| 360 | pull middle and right hills. SoH middle on 2nd, SoH right on 3rd, SoH middle on 5th. | pull left hill | Wastrel's mobs before they come in | wall, SoA yourself, and only seed on hunger waves | stand back and infuse the monk to pull fiends in | |||
| Underlords | Recall MLK; pull Derv | Recall emo; pull Ranger; Recall Emo again; take quest | Go Ranger | Go Derv and bow it | Go Derv and stay back | seed when MT takes damage; PI ranger lord | maintain MT's range | |
| trenches | pop monk trench | turtle mesmer trench | go to glitch spot; kill monk trench | EoE on hill in range of turtle and clover, EE down to team | turtle (step out to wall) | |||
| Lords | pull monk lord out | pull and wall clover; pull necro lord | spike clover; ele lord patrol; kill necro lord | spike clover; skip ele lord patrol; solo ele lord | spike clover; ele lord patrol; kill necro lord | kill monk lord | heal tank at clover; wall ele lord patrol | |
| Tendrils | get to gloom - pop trench if you have time, or go back way if monk lord was late to die | take quest, stand on TK for PI, and pull groups in | kill front left tendril | kill quest side tendrils with MT, and Recall out | kill lower back tendrils with a stone (Gaki preferred) and pull groups in | kill front right tendril if in time | if MLK is not there PI front right tendril, wand and kill; EoE | stand on monk if MLK can't kill his tendril |
| Gloom | ||||||||
| Cave | HoS up off a stone, do cave | DC on gloom patrol | spike gloom patrol | Goltway if trench is not popped | spike gloom patrol | check if MT has emo's LB before you seed | ||
| 1st gloom group | HoS up; make sure everyone jumps up; SoH, pull spirits to NPCs | jump up and go with emo - first to arrive should trigger the group before jumping up | EE up and run to catch earths | |||||
| Earths spawn | Tank 2nd earths if you can | place EoE in range of cave spike, then run to rift | Tank 1st earths group | |||||
| Rift | take quest, Recall trick, quest run | do rift | Let TK Recall you, move towards start | Recall Caller, let TT recall you, recall out | pre-trigger Deathbringer | kill claw with PI, cap rift | cap rift | |
| Deathbringer | DC into the group | EoE in range of darknesses | ||||||
| Darkness | pull darknesses to the wall | place another EoE for earths | wall for earths | |||||